 When embarking on an elearning project, it can be intimidating to think about creating your own interface. There seems to be a never-ending stream of questions to consider: Where do I begin? How do I get buy-in from my stakeholders? Is the final product going to resonate with end users? Too often the questions become so daunting that designers fall back on molding content to fit a template.
The presentation of e-learning content is as critical as the content itself. You can have content of the highest quality, but if the presentation is poor, you will lose the end user. If the interface is confusing or the material is difficult to find, you are asking the end user to make an extra effort to learn.
The solution to designing an effective e-learning interface is to obtain feedback from both stakeholders and end users as early in the design process as possible, before writing code or putting pixels on the screen. The following steps will guide you through the process of creating a prototype for an e-learning interface.
Storyboarding
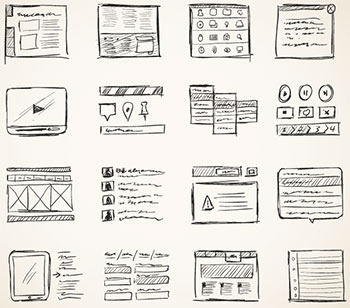
Storyboarding to be an effective way to gather and organize thoughts. The storyboard should lay out the desired outcome for the course. Storyboards prove especially beneficial during initial brainstorming meetings with stakeholders.
The important thing to remember is to keep your storyboards simple. They should not be overly detailed at this stage. They should be quick sketches that help you identify the needs and expectations of your stakeholders and end users.
Make sure to jot down notes for each sketch to explain what it represents. These notes will be helpful as you move forward in the design process.
Early physical prototypes
The purpose of the early physical prototype is to help stakeholders and end users visualize different ways that an interface could be built and function. These prototypes often are crude and can be built using common office supplies, such as paper, folders, markers, and sticky notes.
The sticky notes help stakeholders and users see how the interface will work. Elements of the interface, especially those that will remain static from screen to screen, also can be drawn directly on paper. These static elements can be drawn once and photocopied so that you can make multiple screens quickly. The sticky notes can be placed on top of the elements to represent different states.
For example, a drop-down menu could be drawn on paper, but by using sticky notes, you can better show the layers of functionality within the menu. The “open” state can be shown with a note after the user “clicks” the menu. As he touches the notes to change them, you can peel off one note and place another in its place, representing the “clicked” state.
Watching how users interact with the elements in front of them provides valuable feedback to you as the designer. Are they traveling too much across the screen to get to elements? Do the layout of the elements and their functions work in the context of what the training course is trying to
accomplish?
The great thing about doing this type of prototyping is that changes can be made quickly. It is easy to customize the design through multiple iterations in just a few minutes. Again, it is beneficial to involve stakeholders and end users at this early stage in the design process to get their feedback.
You can even give them materials to demonstrate their own prototype ideas. The more ideas that can be generated at this stage of the process, the better the end product will turn out. Also during this step you should be able to clearly explain the interface to the users, and what you are trying to accomplish with it. Once you have created a solid physical prototype (or two), you can move on to the next step.
Wireframe digital prototypes
Now that you have the physical prototypes, you can take those early designs and build them out to a more refined wireframe digital prototype. It allows you to distribute the prototype to a larger group of end users and gain additional feedback before spending too much time on the design.
These early wireframes can be built with a tool such as Balsamiq Mockup, among others. Balsamiq Mockup is meant for web mockups, but also works well for e-learning interface prototypes. These prototypes are low fidelity, drawing from a library of existing elements that can be placed on the interface. By using this library, you can save a lot of time creating the prototype and making changes to it.
Wireframe digital prototypes give you the opportunity to involve users and stakeholders who are geographically distanced from you. However, if you have the opportunity to observe as end users or stakeholders use the prototype, you will gain better insight into how they are reacting to the interface through their body language.
If you have remote end users, you could use Skype or Google Hangouts to observe their reactions. Facial expressions are a telling sign that someone is having an issue with the interface. This kind of genuine user feedback can be valuable research to take back to stakeholders, and will help you make final decisions on interface elements.
After this phase, the prototype can be refined again, during which final adjustments are made and presented again to key stakeholders.
After the functionality is finalized, you can begin to consider colors, styles, sizes, and other elements to polish up the interface.
Refined prototype
The refined prototype will give your stakeholders an idea of how the final product will look and function. It is important because it is the last step before building the final production output. This step also is a good time to put in pieces of the actual content.
One more round of user testing also can be done. In some cases, the refined prototype can be built in the production software. If you are using a rapid development tool, it can be effective to build pieces of the interface in the tool so that end users are testing the prototype on the platform to be used for the final product. Even though some of the elements still might be simplified versions, they can provide great placeholders for content in the final version of the interface.
Although this process can seem like many iterations, involving end users as much as possible and as early in the process as possible will ensure that the final product is customized to meet their needs and preferences. This process also helps you guard against stakeholders’ disappointment in the final product.
Finally, multiple rounds of testing will help you prevent costly mistakes that must be fixed after the final product is launched.
Reference: T+D May 2014, article by Sean Putman, director of training and documentation for Altair Engineering and principal at Intellectus Learning


